Felty Christmas Tree


This is another christmassy picture that I finished last night.
I used a 6in embroidery hoop, cotton fabric for the background ( I love this snowy looking one - purchased from Ebay UK ), scraps of felt, tiny buttons and embroidery thread to match the felt colours.
The pattern shapes that I used for the tree are pictured below. I used simple straight stitch throughout.

An Early Christmas Present ..


.. to me, from me. Well I can't not treat myself to a crafty book when I'm searching on line book sites for Christmas pressies can I? I have had my eye on Twinkie Chan's book,20 Yummy Treats To Wear for a while and had been waiting for it to be released. Most of the patterns are scarfs and are split into sweet and savoury, fruit and veg.


Besides the cookie scarf featured on the cover, I especially like the egg and bacon scarf and the pear.


I just know my sis and niece is going to love the funky, foodie accessorises in this book so I better go for a rummage through my wool stash and get started on something

Bedtime Bunny


Bedtime Bunny is my latest finished amigurumi. Little people have already tried to claim it but it is all MINE. The pattern I used is from Amigurumi Two ! by Ana Paula Rimoli. I bought her first book Amigurumi World earlier in the year as I was smitten with a little pear featured in it - so far I've made three of these. Though I have been able to crochet for years, it was the first time I used a hook to make a toy. The patterns in Ana's books are easy to follow and the softies are so cute. They go down well with everyone, even hard to please teens.


Heres a link to Ana's blog http://amigurumipatterns.blogspot.com/ so you can go and check out all the softie cuteness for yourself. Also I'm going to have to squirrel away a stash of safety eyes ready for next April as Ana has another book due out, yay!

Let It Snow


A quick little snowflake pic using back stitch and a few french knots and lazy daisy stitches
I used a 5in embroidery hoop, jute fabric to fit and Anchor thread no. 46. I used 3 strands of thread throughout.
 This is the first pattern I have made myself and I'm not entirely happy with aspects of it (especially the wording) Its not brilliant by any means but its here if you want it.

A wet day in Wales

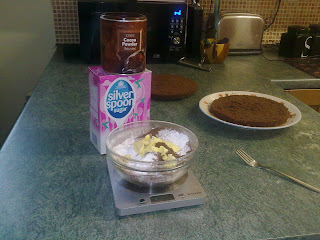
The weather has been terrible here today and with hubby off on another shoot helping a friend I had the day off. I gave the house a once over then made this scrummy chocolate fudge cake ;

Chocolate Fudge Cake
8oz caster sugar
8oz soft margarine
3tbsp cocoa
3tbsp hot water
4 eggs
vanilla essence
8oz self raising flour

fudgy topping +filling
2 1\2 oz cocoa
6oz icing sugar
4oz butter

1-cream together the butter and sugar

2-mix cocoa and hot water toigether then add to the butter and sugar mix
3-add the eggs to your mix and blend well
4-now add a couple of drops of vanilla essence and your flour and mix until well combined

5- pour the mix into a prepared tin ( greased and lined with paper) then put into the oven 180c,gas4,350f  for 50- 60 mins

6- remove from the oven and leave to cool

7- once its cool slice in half ready to put in your fudgy filling

8- put butter, icing sugar and cocoa into a bowl and mix with a fork until it becomes fudgy. next spread on the bottom half of your cake and sandwich the two pieces together. spread the remaining fudge over the cake ( you may find a knife dipped in boiling water helps to spread it easier) .
9- now your cake is ready to eat. Tastes delicious warmed in the microwave and served with cream.

Chelsea Buns

I made a batch of Chelsea buns in between getting ready for the shoot yesterday. Taken ages to get my pics on cos im struggling to work this new phone.

Chelsea buns;(makes 9)
150ml boiling water
150ml milk
10.5g dried yeast
18oz strong white flour
1 1/2 tsp caster sugar
75g butter

35g melted butter
60g caster sugar
60g currants

glaze-1tbspcaster sugar+ 2tbsps milk

1-sift flour into a warm baking bowl and rub in butter.
2- In a small bowl mix milk and water, sprinkle the yeast on top and stir in the 1 1/2 tsp of caster sugar. leave for 10 mins till risen
3-stir the yeasted liquid into the flour with a wooden spoon. when the mix comes together use your hands to knead it to a smooth elastic.
4-cover the bowl lighty and set aside in a warm place until risen. approx 45mins

5-knock back the risen dough then turn out onto a floured board and knead some more.roll into a rectangle measuring 18*9 inches.
6-brush the surface of the dough with the melted butter.sprinkle with the caster sugar and currants.

7-using your hands roll the dough tightly like a swiss roll.take a sharp knife and cut into 9 slices.set these slices cut side up in a small greased roasting tin.

8-cover lightly and leave to prove for 20mins until fluffy.

9-bake in a hot ovengas7,425f,220c for 20 mins.Allow to firm up in the tin for 5 mins.boil together the sugar and milk and brush over the surface of the buns.


Little Shrug Cardigan

Little L's shrug/cardigan was finished last night. I used some of my donated wool stash for this as it had just the right type of wool for the pattern, Tiny Tots DK. The pattern used for this is a SIRDAR pattern, number 1726