My Crafty Year

As 2010 is nearly reached its end I thought that I would look back at the things I had been doing craft wise this year.

1) Crochet seemed to have been my main crafty outlet this year and especially appeared to have a love of making blankets.

2) I learnt how to make an embroidery transfer and even made my own pattern up. Fair enough its no Picasso but as a first attempt I was feeling quite chuffed with myself.

3) I discovered Amigurumi. Having never used crochet to make any toys before, I was soon hooked.

4) I learnt how to read a Japanese crochet pattern.  Having only used UK and US crochet patterns ( written format ) before I was slightly daunted when I first looked at a diagram pattern but it was easy peasey and I soon started whizzing through them.

5) I discovered Ravelry. A free online community site for knitters and crocheters. I could spent hours on there just looking at all the patterns available.

6) My first patchwork quilt was made. Abet a very small one for Little L's dolls cot but I still managed one

7) A wealth of information was found when I discovered a world of crafty blogs. I stumbled on these blogs while I was looking for a craft tutorial one day. I now follow about 60 but not all craft related, some for recipes and some just nice every day ramblings.

For my next crafty year I suppose I will be just going with whatever takes my fancy at the time but one thing I do want and desperately need to do is to organise all my craft things. They are all over the house. In the living room, on the landing, under the bed. As you can imagine this can be a bit inconvenient especially when the children are in bed and I am rummaging around the rooms at night so this is a 'must do' thing.


Just In Time ..

We bought this old cot with the intentions of renovating for Little L for Christmas. This was an absolute age ago and it has only just been finished off tonight. It was left so late as besides a new paint job the only other thing that needed doing was one of the brackets to hold the drop side up was missing so needed replacing . I thought that could easily remedied by a quick trip to B & Q for a bracket but it turned out there was nothing similar there. Luckily I have a very clever husband who made some for it. So after being repainted, I used a Farrow & Hall paint - Pink Ground, it was ready for the lovely original 50's decals that I had found. This did not turn out as expected either as when I tried to remove the backing paper, very carefully, they just came away in bits. With us leaving it till the last minute and the Christmas deliveries being how they are, there was just no chance of getting any more until after the holidays.


Before


After


The mattress was made by cutting a piece of foam to size and covering with calico. I made the sheets and pillow from an old flannelette cot sheet, the pillow case was embroidered and prettied with a crochet edge,I then made a crochet blanket and my first ever patchwork quilt. 


I'm sure Little L will be as pleased as punch when she wakes on Christmas day and receives this cot  to put her baba's in.

A Happy 36th Birthday ...


.. not mine unfortunately. Mine whizzed by a few years ago but my wonderful little sis has turned 36 today.Here she is ALOT younger, posing again .. hehe.


As part of her pressie from us I made her a blankie. On one of her visits she sat on my sofa and covered herself with Little L's blanket, told me how comfy it was and said ' you could just go to sleep under this '. The next minute she was snoozing away. I have gotten used to Jay just dropping off ( she does get up at unheard of hours every day to walk the dogs ).Little L just stared at her, not knowing what to make of the sleeping blankie thief.

Happy Birthday Sleeping Beauty - my lovely little sis x

New Crafty Books


These tatting books were given to me by my friend Jo who ended up with them herself when she was given a pile of cross stitch books. Jo had no interest in them so sent them my way. I've never had a go at tatting so it will be something new for me to try in the new year.
Thank you again Jo and to my friends and family who think of my crafty ways when they send me buttons, wool, felt, etc and anything else they think I may like. x


Feeling Christmassy

It doesn't feel as though Christmas will soon be upon here at the moment but I think that is just because we haven't put the tree or decorations up yet so I decided to start the Christmassy feeling off with some seasonal tunes and paper chain making. I discovered that Little L does not care much for Nat King Cole or Bing Crosby. She likes something a little more upbeat. Also I found out that the strips of paper for making paper chains these days have changed since I made them with the boys. They have glue ! . No more waiting for the gallons of slobber to dry then bodge them up with sellotape.

In the afternoon I rustled these up for my mum. Last week my mum had been to a garden centre (she haunts the places at Christmas, drawn to all the lights and decorations) and told me about some little felt trees she had seen. She told me that they were plain felt and just glued together. Now I know she was a bit disgusted at the prices charged for these thrown together items but I don't know if it was also a hint for me to make some or not .. so I made her some anyway. Just hope mine don't get the comments that the offensive little trees in the garden centre did.


For theses I cut out 2 tree shapes with pinking shears and used straight stitch round the edges inserting a small length of ribbon at the top for a loop and a piece of brown felt at the bottom. When I had nearly reached the end, I pushed in a small amount of stuffing. I then sewed on tiny buttons for baubles

Crochet Foodie Thingies


Since last week I have been stuck into my Twinkie Chan book. The patterns are clearly written and easy to follow. First, I made these Strawberry Mitts which I kept for myself,


 the Cupcake Hat for my niece which I'm glad to hear she loves,


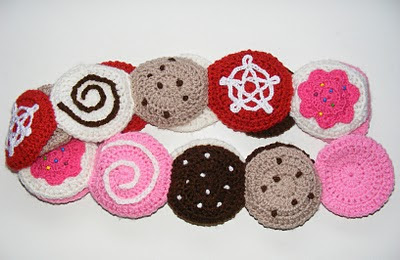
then the Cookie Scarf featured on the cover. I decided to make the chocolate chips on the scarf by making french knots instead of sticking on little poms poms as in the book then thought the back of the scarf looked messy so I made more cookie bases and slip stitched together on the last round. While this looks tidier it has made the scarf quite bulky so I'm hoping with a wash and a few wears that it will lose some of the chunkiness.
I'm making some more mitts from the book at the moment and I don't know if the boys were embarrassed or just amused when I pulled my hook and wool from my handbag today while waiting for their orthodontist appointment. We are always in there for quite some time and I managed to crochet one and half cuffs for my mitts. Beats reading magazines which are about 12 months out of date ( and they are the recent ones ).


Felty Christmas Tree


This is another christmassy picture that I finished last night.
I used a 6in embroidery hoop, cotton fabric for the background ( I love this snowy looking one - purchased from Ebay UK ), scraps of felt, tiny buttons and embroidery thread to match the felt colours.
The pattern shapes that I used for the tree are pictured below. I used simple straight stitch throughout.

An Early Christmas Present ..


.. to me, from me. Well I can't not treat myself to a crafty book when I'm searching on line book sites for Christmas pressies can I? I have had my eye on Twinkie Chan's book,20 Yummy Treats To Wear for a while and had been waiting for it to be released. Most of the patterns are scarfs and are split into sweet and savoury, fruit and veg.


Besides the cookie scarf featured on the cover, I especially like the egg and bacon scarf and the pear.


I just know my sis and niece is going to love the funky, foodie accessorises in this book so I better go for a rummage through my wool stash and get started on something

Bedtime Bunny


Bedtime Bunny is my latest finished amigurumi. Little people have already tried to claim it but it is all MINE. The pattern I used is from Amigurumi Two ! by Ana Paula Rimoli. I bought her first book Amigurumi World earlier in the year as I was smitten with a little pear featured in it - so far I've made three of these. Though I have been able to crochet for years, it was the first time I used a hook to make a toy. The patterns in Ana's books are easy to follow and the softies are so cute. They go down well with everyone, even hard to please teens.


Heres a link to Ana's blog http://amigurumipatterns.blogspot.com/ so you can go and check out all the softie cuteness for yourself. Also I'm going to have to squirrel away a stash of safety eyes ready for next April as Ana has another book due out, yay!

Let It Snow


A quick little snowflake pic using back stitch and a few french knots and lazy daisy stitches
I used a 5in embroidery hoop, jute fabric to fit and Anchor thread no. 46. I used 3 strands of thread throughout.
 This is the first pattern I have made myself and I'm not entirely happy with aspects of it (especially the wording) Its not brilliant by any means but its here if you want it.

A wet day in Wales

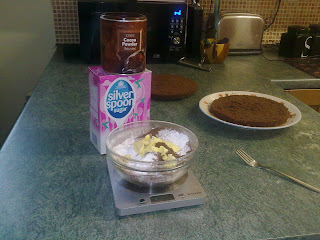
The weather has been terrible here today and with hubby off on another shoot helping a friend I had the day off. I gave the house a once over then made this scrummy chocolate fudge cake ;

Chocolate Fudge Cake
8oz caster sugar
8oz soft margarine
3tbsp cocoa
3tbsp hot water
4 eggs
vanilla essence
8oz self raising flour

fudgy topping +filling
2 1\2 oz cocoa
6oz icing sugar
4oz butter

1-cream together the butter and sugar

2-mix cocoa and hot water toigether then add to the butter and sugar mix
3-add the eggs to your mix and blend well
4-now add a couple of drops of vanilla essence and your flour and mix until well combined

5- pour the mix into a prepared tin ( greased and lined with paper) then put into the oven 180c,gas4,350f  for 50- 60 mins

6- remove from the oven and leave to cool

7- once its cool slice in half ready to put in your fudgy filling

8- put butter, icing sugar and cocoa into a bowl and mix with a fork until it becomes fudgy. next spread on the bottom half of your cake and sandwich the two pieces together. spread the remaining fudge over the cake ( you may find a knife dipped in boiling water helps to spread it easier) .
9- now your cake is ready to eat. Tastes delicious warmed in the microwave and served with cream.

Chelsea Buns

I made a batch of Chelsea buns in between getting ready for the shoot yesterday. Taken ages to get my pics on cos im struggling to work this new phone.

Chelsea buns;(makes 9)
150ml boiling water
150ml milk
10.5g dried yeast
18oz strong white flour
1 1/2 tsp caster sugar
75g butter

35g melted butter
60g caster sugar
60g currants

glaze-1tbspcaster sugar+ 2tbsps milk

1-sift flour into a warm baking bowl and rub in butter.
2- In a small bowl mix milk and water, sprinkle the yeast on top and stir in the 1 1/2 tsp of caster sugar. leave for 10 mins till risen
3-stir the yeasted liquid into the flour with a wooden spoon. when the mix comes together use your hands to knead it to a smooth elastic.
4-cover the bowl lighty and set aside in a warm place until risen. approx 45mins

5-knock back the risen dough then turn out onto a floured board and knead some more.roll into a rectangle measuring 18*9 inches.
6-brush the surface of the dough with the melted butter.sprinkle with the caster sugar and currants.

7-using your hands roll the dough tightly like a swiss roll.take a sharp knife and cut into 9 slices.set these slices cut side up in a small greased roasting tin.

8-cover lightly and leave to prove for 20mins until fluffy.

9-bake in a hot ovengas7,425f,220c for 20 mins.Allow to firm up in the tin for 5 mins.boil together the sugar and milk and brush over the surface of the buns.


Little Shrug Cardigan

Little L's shrug/cardigan was finished last night. I used some of my donated wool stash for this as it had just the right type of wool for the pattern, Tiny Tots DK. The pattern used for this is a SIRDAR pattern, number 1726

Simple Needle Wraps

At the moment my knitting needles and crochet hooks live happily along side each other in an old knitting bag. That is until I need to find a pair of needles or hook then the entire contains are spilled on my bed for me to rummage through. Which is all well and good but doing it at night when Little L is in bed is a delicate situation, those needles seem to click and clank together more when they should be quiet. So the other night while watching the telly, I made these quick needle wraps.
CROCHET NEEDLE WRAPS
3.oomm hook

Oddments of DK wool

Chain 22

Tr into the 4th ch from hook the tr into every chain

Change to a contrast colour

Slst all the way round to the point where the contrast colour was joined

Chain 5 ( This is used to form a loop )

Fasten off

Form a loop with the 5 chain and attach a small button to fasten


KNITTED NEEDLE WRAPS

3.25mm knitting needles

Oddments of DK wool


Cast on 5 sts

K1, P1, rib until the piece measures approximately 8cm

Rib 2, yf, k2tog, rib 1

Rib 3 more rows

Cast off

Attach a small button to fasten


Really quick and easy wraps.
Next is trying and take control of the pesky crochet hooks


eggciting news from the chicken pen


My mixed bunch of chickens have reached the age where they have started laying. For the last week ive picked up 1 egg a day and today there were 2. Once all my ladies are laying I should be getting around 50 eggs a week. The plan being we sell any surplus and the kids will split the money. Im  most looking forward to my araucans or easter egg chickens laying as they are the only chicken that lays a blue egg.

Autumn Leaves


While the weather was fine this morning, I thought I'd take Little L out to collect some autumn leaves so off we went armed with one of Little L's bags. I had it in my head to show her how to do leaf rubbing we went got back home so I was looking for ' nice leaves ' but to Little L, a leaf was a leaf, soggy or half eaten ones went in to her bag all the same, no leaf discrimination in her collecting.


The table was covered in leaves and the paper and wax crayons came out ready for a leaf rubbing session but Little L had her own ideas and wanted to draw Quack, Quacks instead. Next we decided to get the glue out.


Ta - Dah ! Little L's leafy pics ready to be displayed on my fridge.

No trick or treaters here

Living out in the sticks where we are we never get any trick or treaters. To be honest I think most people would be too scared to come down here at night. With noone to see pumpkins we decided to be adventurous and make eclairs today. Its the first time ive ever made them and although the chocolate sauce looks a bit messy they tasted gorgeous.

BOO

Happy Halloween and welcome to Bits and Bobs.


Today was my little girl's first time scooping out a pumpkin. Needless to say things got more than a tad messy but both her and the boys enjoyed it. They get passed to the husband then for carving.


Finished pumpkins ready to greet Trick or Treaters.


This year I thought I'd try a recipe for roasted pumpkin seeds. Usually they end up in the bin anyway so I had nothing to lose. It didn't turn out to be the great success I hoped for so they ended up at their usual final destination - the bin.

The boys went off trick or treating. Little girl is too young yet but she loved handing sweets out to the children who came to our house. I'm sure they have multiplied in number this year as we seem to be going through the sweet supply pretty fast- ( I only helped myself to 4 then I thought they were going to pull my old teeth out so stopped ). Anyway I better go and get ready for another knock.


Bye Shell